Tuesday, November 26, 2013

Wedding

We got hitched!
we have been together for 9 years and we have finally decided to get married. We set the date for Nov 23, 2013 and were joined by our kids, and close family (who drove 12 hours to join us on our special day)
it was not a grand event. We chose just to have a lunch buffet at our home and the ceremony at a park.
Lucky for us I chose the coldest day of the month to get married. all month long we have had wonderful weather in the 70's and 60's super sunny and beautiful, then BAM! we get a severe cold front and super cloudy day on the day of our wedding. We were also under a snow storm watch! IN NOV! IN NEW MEXICO!!
The ceremony was great freezing but great, everyone huddled close together just to stay warm! got a few photos and raced back home. we started the fire pit in the back yard and ate lots and lots of yummy food. Turned up the music and got jiggy with it!
Around 10 pm it began hailing then snowing where it continued snowing until the next day for a grand total of 3 inches. Now I leave you with the photos from the day and some of the snow the next day. Please try not to pay to much attention to the fluffy bride.


we painted a canvas instead of a sand ceremony, I had intended for us to drip the paint down the canvas but it was so cold that the paint was to cold to drip down.

the kids painting the canvas


Our oldest, our nephew and my best friends daughter.


The view out the front door


Here is a breakdown of our DIY wedding cost's
Wedding officiant $165
Wedding dress $60 including shoes
Grooms outfit-free (military uniform)
Flower girl   - $6 Pre- gifted outfit from grandmother cost is just for shoes
Flower girl 2  $11 including shoes
Ring bearer $8 including shoes Pre -owned outfit given to us for free this is just for shoes and tie
Father of the bride button up shirt ,slacks and $6.50
Flower bouquet and other flowers for ceremony hand made $2
Glass toast glasses & 8 large wine glasses  $4.50
Ring bearer pillow $2
Cake $10 ( brides mother decorated it, baked by bride)
Food $20 buffet style food prepared by bride, mother and mother in law
Canvas to combine family instead of sand ceremony $1
Paints for canvas $6
Make up and Hair -free from friends/neighbors
Photography - free from friends
Minus $50 gift card won from a Halloween costume contest
Grand total  $252!
most items were purchased at thrift/second hand stores, already pre-owned or gifted to us


Saturday, November 9, 2013

wedding shoes redo

We are finally getting married! and I say finally because we have been together for 8 years now! either way it wouldn't be a wedding unless I DIY it. I found my perfect shoes at Savers for $5.99 not too shabby eh. But, there is a small defect on them. But hey who really cares cause i'm about to cover that little defect up.
They are too cute
                         Lets get started, I drew out a heart shape with a NON permanent marker.

Then I placed hot glue on only half of the heart shape, sorry no photo of the next step but its self explanatory I dipped the shoe into a bowl of glass seed beads so that they could get stuck on the shoe. next add hot glue to the other half and repeat 

And Ta Daaa you have customized your new to you wedding shoes.


Thanks for stopping by, see you soon!


Monday, October 28, 2013

Procrastinating

Well I have been procrastinating, and now its catching up to me. I have not worked on my kids Halloween costumes and Halloween is only a few days away! I'm usually pretty good at getting their things started early. so this will be a very short post because i'm off to get the supplies needed and will be back with updates for now I will be leaving you with their costumes from last year.

all costumes were made by me including the zombie make up, for the zombies I used unflavored gelatin, oatmeal, glycerin, water , corn syrup , food coloring and regular make up to match our skin color. my son was Bumblebee transformer that actually transformed he won first place in a Halloween costume contest. his costume consisted of cardboard lots and lots of hot glue, yellow and black acrylic paints, solar lights from the backyard and a mask and suit bought on sale the previous year for about 3 dollars. my smallest trick or treater's costume consisted of a hand crochet cherry hat with a pipe cleaner for a stem, cotton batting from an old pillow, paper sprinkles, hot glue, pink acrylic paint, and a thrifted lampshade that I purchased for about two dollars.
original photo taken by our local radio station


Friday, October 11, 2013

Paper floor update

Hi there I just got my camera back from the repair shop! yay whooo hooo uh huh uh huh doing the happy dance over here. I can now have way better images on my blog again. Anyways here are some updated photos of my paper floor just don't mind the unfinished decor and broken furniture. I managed to break one of my bookshelves when moving them back in, I should have waited for the hubby to be here to help me out. I also need a new entertainment center. there are so many things that I need to get done and I just don't have enough time or energy.
Involving the update the floor is doing beautifully for almost a month now, the kids are definitely not easy on the floor, they spill they scuff and bring in lots of dust and dirt. We also have two chihuahuas the are always on running back and forth. It still looks great! super shiny, the only other thing I should have researched was the color. There is nothing wrong with the color I love it so much but since its a dark color every little speck of dust shows up. Its still 10 x better than it being stuck in the carpet. I dust mop every morning and mop with vinegar every other day and that's about all I have to do. I did place all the furniture on little felt pads so they could not scratch up the floor.

and if you look closely you can see exactly how dirty this floor is and i'm sorry but this is reality and we do live here. just keeping it real.

again very dusty and needs mopping, keeping it real

Sunday, October 6, 2013

Cast iron

I have fallen in love with cast iron. I originally started with my round griddle which I use to make tortillas. Reheat tamales, and make quesadillas yes I'm such a mexican lol! Then I found an old rusty pan at my moms house brought it home and did my research on how to clean it up and season it. After that I was hooked I got rid of my non stick aluminum cookware  and began the search for some more cast iron pieces. We live right next to a flea market. I found various pieces but the prices were a little steep for me.they were asking for 20-30$ a pan. I kept on searching I finally found a set of three at Wal-Mart for 20 bucks. Returned home and read the reviews and they were not great. I was determined to make them work I washed them and began the seasoning process. And  low and behold it worked they seasoned beautifully!! It has been six months since I have been using them and I am still very much in love with them. I also have a 6 qt dutch oven in my arsenal.
What's your favorite cookware?

Wednesday, October 2, 2013

Shower curtain re-do

I love my shower curtain and just recently painted my bathroom gray with a half a gallon that my neighbor gave me. The bathroom sat there with no other color other than grey black and white, and it was starting to get me bored. I tried adding in some pops of color but the colors I liked still looked to bland ughhh. and to top it off my walls feel like they are a mile high maybe because they are about 12 feet tall! Anyways I began looking online for some good colors to add into the bathroom and finally I came up with YELLOW!
Youngest DD and I took a trip over to Walmart and began the search we found a great cotton fabric for only 2.44 a yard two yards later and a few other items to redo the bath and we were home. washed the shower curtains and began to work. Here is a quick tutorial and I apologize for the bad photos my camera is still being repaired and it doesn't help that the bathroom is tiny and dark.
Measure out the shower curtain
cut the two yards of yellow cotton in half. see the line I cut right down the middle and that became the new addition


After measuring out the ruffling. I had about a foot left over that I cut off.  I used my serger to serge the three sides that would be fraying and left the selvage unserged


I used my ruffler foot to create even ruffles but the easy way to do this is to set your machine to the longest stitch and turn up your tension to the highest number. and sew a straight line you will see the ruffles gathering.


Lastly attached the new ruffle skirt to the underside of the shower curtain. I also purchased another inexpensive shower curtain liner and serged it to my exsisting shower liner to compensate for the additional length and cut off the excess. Now place everything back on the rod and hang up.
Total cost for this project was $7 pretty nice if you ask me.
Now I have to try and rescue my poor fridge because it is making a very loud and annoying squealing sound so I hope its not on its last leg. Keep your fingers crossed


shower liners sewed together

blah BEFORE

The finished result!!

Tuesday, October 1, 2013

Still Here

Sorry for being missing in actions. There has been quite a few goings on here that have kept me from posting. Our oldest DD had surgery last friday 9/27 nothing major just a septoplasty to correct deviated septum, she has been slowly recuperating from that. I also had to send in my camera for repair so no photos until it returns back to me hopefully they are able to fix it. I will be back tomorrow with a few photos from my phone and some more DIY's thanks for stopping by and see you soon.

Monday, September 23, 2013

Loofahs

Way back in May I planted five little loofah gourd seeds, They were planted along side my watermelons,cucumbers, and cantaloupe. Out of all five seeds only two plants grew not too bad because they have provided me with lots of loofahs. This year I grew all of these plants on 8ft trellis made with cattle guards and t-posts. I had the guy at the store cut the 16ft panels in half for me. After months of growing and everything else harvested and vines cleared off the only thing remaining were my loofahs. Here is a tutorial on harvesting loofahs wait until loofahs have turned brown and dry, they will easily break off the vines if not use some scissors. This photo was taken a few days ago and you can see that they are still yellow a little bit of patience and they will turn brown.


Here is a close up, you can see they go from green to yellow.
and finally turn brown, then they sound like maracas with the seeds inside. Collect your dried up loofahs and head inside.
Break open the bottom edge which is usually wider and shake out the seeds for next year.
Fill a pot with water and soak for a little bit.

Peel off skins, this part can have an ick factor if you dislike slimy things because it will feel slimy, don't say I didnt warn you


Cut off ends with scissors to give them a more uniform look, I cut off both ends and save the little scraps which will eventually be used in soaps.

Cut thru the center now

Let your homegrown loofahs dry out so you can remove the rest of the pesky seeds. Then Take one in the shower wet a little until it gets soft add some soap and exfoliate you body. always let these dry out or they can get mildew. I always rinse off extra soap and stand on the cut end to dry where it will wait for the next shower. Just in case you are wondering yes I do make our own soaps recipes and instructions coming soon.

Thursday, September 19, 2013

I LOVE craigslist!

A while back I had been looking for some bunk beds for my two youngest little ones and by back then was last year in Sept. Yes it has been a year since this makeover but I still have to share it with you. Back to the bed I found a gentleman who was selling a bunk bed for $40 when I went to check it out I saw this and fell in love with them. OK OK they were not too bad for $40 here is the kicker they had no railing, still not bad. While I made my decision the guy says "well since I don't have the rail for it you can pick anything else in the garage that you like" I looked at him like he was crazy and prompt fully said OK. I didn't see anything else that had caught my eye then I saw it a HUGE decorative mirror. she came home with me too but I will leave you in suspense about that one for now here is the redo of these beds.
 Brought them home gave them a good wash and a light sanding and got to priming them here they are primed. I was going to do them a bright color and then decided that I liked them in white. so I used a gloss spray paint and finished them up.

The Beautiful AFTER! and don't worry my son has a guard rail on there but its one of the toddler ones and it did not look very nice for the photo, I will also have another post with the whole room finished soon.

THANKS FOR STOPPING BY!

Wednesday, September 18, 2013

Canning

I tried my hand at canning today, lets hope I did it right and I don't wind up getting us very sick.

My tomato plants are still giving me lots and lots of tomatoes and when I say plants I really mean bushes because I never did get around to pruning them and they grew out of control! one is a little over six feet tall, and the other one gave up on trying to grow in the cage and fell to the ground where it has been giving me lots and lots of cherry tomatoes. and I had a voluntary roma tomato plant that grew on its own behind the shed it is also sprawled on the floor happily giving me romas.


I also made Ketchup earlier this one is not canned, but was made with tomatoes from the backyard and it came out very very delish!

aaaaaaaaannnnnnd on another completly diffrent note I have yet to finish my living room floor. but I have moved in a coffee table and the couch. hopefully I get motivated to finish the rest of the poly coats on it.

Monday, September 16, 2013

Grassy

We have lived in this home for 5 years and it has only been one and a half year since our backyard has been landscaped. I managed to do this with a little bit of help from friends and family, while my husband was deployed last year. 
close up of our grass a photo sent to daddy while he was deployed

A few years ago I had made some pavers  with a similar mold that my neighbor had let me borrow but I got tiered of where they were placed and decided to rip them up and pile them up, knowing I would eventually do something else. please don't laugh at my backyard it was dirt for a long time. When I tried to grow grass all I got were weeds and not the nice kind of weeds we got nasty sticker/prickly seed weeds.

 The man had been wanting artificial grass but man oh man was that stuff expensive! until finally we looked on eBay and whadda ya know they have it!  sent off for some samples and finally ordered enough so that the kids could safely play on the play house 15x15 ft. we had it delivered to a friends workshop since shipping to a business was free, grand total of the grass was $450. they also threw in another roll of cheaper looking grass in 10 x 15 size but that was horrible it was white! Who in their right minds would want WHITE artificial grass! oh well I would find a use for this.
Ordered 6 tons of pea gravel for $200 delivered and 2 tons of crusher fine for underneath the grass.
metal edging to contain the crusher fine and grass for $80 large stakes to stake down grass and weed barrier for $40 then proceeded to get to work 
lay down weed barrier and stake down. 

measured out where I wanted the grass to be at and painstakingly with the help of my  17 year old little brother staked down the metal edging ( this is definitely a two person job) some how it still wound up crooked. Filled in with crusher fine and moving two tons of crusher fine is not an easy task. Wheelbarrow after wheelbarrow finally was done raked all in place and hand tamped it while slowly wetting it. Once this was done I began arranging my pavers into the areas that I wanted them, spacing them out about two inches apart and placed pea gravel in between.

For the grass I rolled it out onto its designated area stretched and used stakes every 10 inches here is a time lapse video for you and sorry for my naked kiddos running around. the only way I could have installed the grass was by tipping over the play house because I was NOT going to dismantle it. I had four of my neighbors come over to help me with this. I also found a use for the White piece of grass that came with mine I placed it underneath the actual green one and it provided move cushion, you can see it as I move the grass over it. 


 THE GRAND FINALE!

Thanks for stopping by and see you soon!

Sunday, September 15, 2013

Cob oven

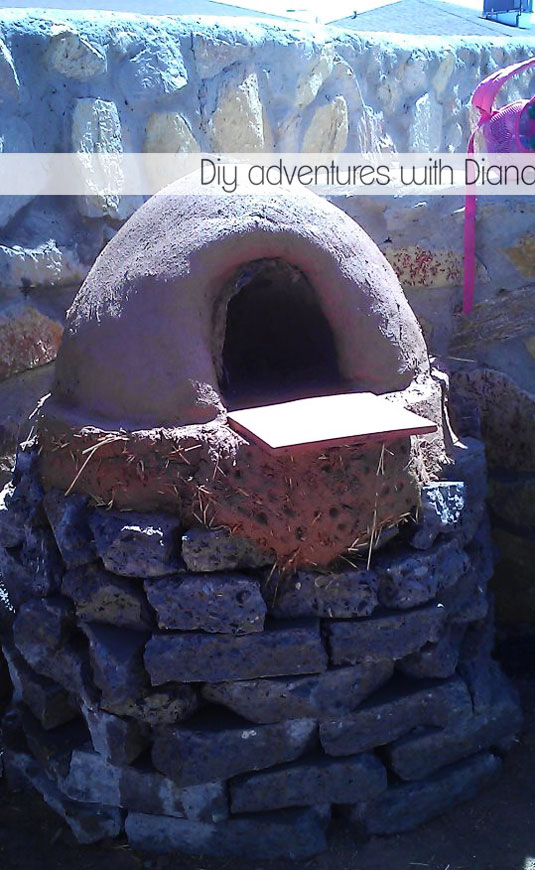
Here is project a cob oven 
(links to actual better instructions will be at the end of this post,this is just the way I built it and has worked for me)

It all began with the city ripping up sidewalk by my kids school to add new streets. I kept on driving by and seeing these giant piles of cement piled up and thought 
"oh man someone could do something with all this broken up concrete!" went back home and looked online and to my surprise. People are working with this stuff as I speak, its called urbanite  Man oh man the things people make with this. Well long story short one of the things people have made with this is a base for a cob oven. Cob is basically mud mixed with sand to create a building material similar to adobe. Around here our dirt is the perfect consistency to create adobe, Yay me!
so in a corner of our yard I decided WE MUST have a cob oven!!!
Off I went asking the men what they were going to do with the broken up concrete. several weird looks and the chunks of concrete were mine. Now picture this, there I am loading up giant pieces of concrete into the back of my minivan, yeah not fun and my back or my minivan thought this was fun! 
It took three loads and when I returned for the second load I got smart and brought my sledge hammer. 
and here it is in all its glory the first of three loads of "urbanite"
Back at home while unloading this I get a remark by my hubby "what is this junk!" LOL 
I just looked at him and smiled "This junk is going to be beautiful you just watch"
little did he know that it would soon be stacked and made into something beautiful. Sometimes I don't know why he even doubts me.


Step one choose a level area away from your yard start arranging urbanite into a circular form mine is about 3 ft wide keep stacking urbanite until you have reached desired height, mine is about hip height and I am pretty short! once completed fill the center of it with dirt, gravel or urbanite. I chose urbanite because i'm cheap and I already had lots of it.
My daughter after seeing this she says " Mom are you making a wishing well?" Nope sorry sweetie but it will be something more awesome!


Step two which you should have done in advance is find suitable dirt for this project that contains clay, luckily for me I live in New Mexico and there is lots of clay dirt here. I have landscaped my backyard but the side of my house still has areas of dirt. loaded dirt into wheelbarrow one buckets worth and then onto an old sheet on the ground added some hay and water and dove in. Mix is done when it has the consistency of play dough  Just in case you are wondering those are my feet they are perfect for mixing the mud


Step three place this mixture onto the base forming a circle and filling it in of about 3 inches 
Step four make a two inch lip around the base you have made and fill in with sand this will be floor of your cob oven some people make it higher and add glass bottles but since I cant follow directions for the life of me I make adjustments and so i filled it with sand wait for this to dry over night.


step five place fire bricks or in my case saltillo tile, If I could have found the brick I would have used those but this was the best next thing. If you can find the fire proof bricks get them. because after weeks and weeks of using the oven the tiles have cracked due to the high heat, there is no problem with them at all they are still a great cooking surface, as long as you dont mind seeing the broken tiles.


step six begin building dome of sand this will be the inside of your oven. On this I actually followed the instructions and built it according. the height needed to be 16 inches high so up went my half egg dome shape


step seven cover with wet newspaper and mix some more clay dirt and sand (no hay)
cover up egg dome with about 3-4 inches of this mixture I decided to leave an opening so that I would not have to cut it out later on, leave to dry for about a week. but knowing me I waited about two days and began digging out all the sand from the inside. and slowly began building small fires to dry the inside of it out.


there are several other steps to finish this oven but I have left it as is, these pictures are from my first pizzas and of course they looked horrible but tasted yummy. But I promise to break out my big girl camera for some better shots. I have since gotten better at cooking in my oven and have perfected my pizza dough, recipe coming soon

How to build cob oven this is one of the blogs I used as a tutorial for my cob oven