
Here is project a cob oven
(links to actual better instructions will be at the end of this post,this is just the way I built it and has worked for me)
It all began with the city ripping up sidewalk by my kids school to add new streets. I kept on driving by and seeing these giant piles of cement piled up and thought
"oh man someone could do something with all this broken up concrete!" went back home and looked online and to my surprise. People are working with this stuff as I speak, its called urbanite Man oh man the things people make with this. Well long story short one of the things people have made with this is a base for a cob oven. Cob is basically mud mixed with sand to create a building material similar to adobe. Around here our dirt is the perfect consistency to create adobe, Yay me!
so in a corner of our yard I decided WE MUST have a cob oven!!!
Off I went asking the men what they were going to do with the broken up concrete. several weird looks and the chunks of concrete were mine. Now picture this, there I am loading up giant pieces of concrete into the back of my minivan, yeah not fun and my back or my minivan thought this was fun!
It took three loads and when I returned for the second load I got smart and brought my sledge hammer.
and here it is in all its glory the first of three loads of "urbanite"
Back at home while unloading this I get a remark by my hubby "what is this junk!" LOL
I just looked at him and smiled "This junk is going to be beautiful you just watch"
little did he know that it would soon be stacked and made into something beautiful. Sometimes I don't know why he even doubts me.

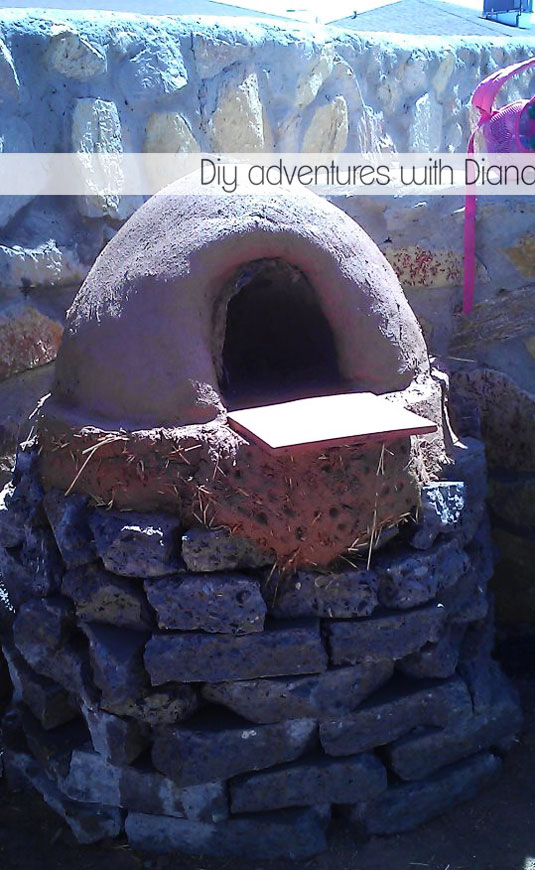
Step one choose a level area away from your yard start arranging urbanite into a circular form mine is about 3 ft wide keep stacking urbanite until you have reached desired height, mine is about hip height and I am pretty short! once completed fill the center of it with dirt, gravel or urbanite. I chose urbanite because i'm cheap and I already had lots of it.
My daughter after seeing this she says " Mom are you making a wishing well?" Nope sorry sweetie but it will be something more awesome!

Step two which you should have done in advance is find suitable dirt for this project that contains clay, luckily for me I live in New Mexico and there is lots of clay dirt here. I have landscaped my backyard but the side of my house still has areas of dirt. loaded dirt into wheelbarrow one buckets worth and then onto an old sheet on the ground added some hay and water and dove in. Mix is done when it has the consistency of play dough Just in case you are wondering those are my feet they are perfect for mixing the mud

Step three place this mixture onto the base forming a circle and filling it in of about 3 inches
Step four make a two inch lip around the base you have made and fill in with sand this will be floor of your cob oven some people make it higher and add glass bottles but since I cant follow directions for the life of me I make adjustments and so i filled it with sand wait for this to dry over night.

step five place fire bricks or in my case saltillo tile, If I could have found the brick I would have used those but this was the best next thing. If you can find the fire proof bricks get them. because after weeks and weeks of using the oven the tiles have cracked due to the high heat, there is no problem with them at all they are still a great cooking surface, as long as you dont mind seeing the broken tiles.

step six begin building dome of sand this will be the inside of your oven. On this I actually followed the instructions and built it according. the height needed to be 16 inches high so up went my half egg dome shape


step seven cover with wet newspaper and mix some more clay dirt and sand (no hay)
cover up egg dome with about 3-4 inches of this mixture I decided to leave an opening so that I would not have to cut it out later on, leave to dry for about a week. but knowing me I waited about two days and began digging out all the sand from the inside. and slowly began building small fires to dry the inside of it out.

there are several other steps to finish this oven but I have left it as is, these pictures are from my first pizzas and of course they looked horrible but tasted yummy. But I promise to break out my big girl camera for some better shots. I have since gotten better at cooking in my oven and have perfected my pizza dough, recipe coming soon

How to build cob oven this is one of the blogs I used as a tutorial for my cob oven
No comments:
Post a Comment